Update(s)
| Date | Update |
| 10/03/2024 | First version of my home lab online |
| 03/04/2024 | Added: – second Proxmox Server – TrueNas sync with AWS S3 – NoIP – Vaultwarden – NGINX Proxy server |
| 06/04/2024 | Added: – Unmanaged 24 port LinkSys Switch – Uptime Kuma – Cable fronts |
| 14/04/2024 | Added: – Unify Dream Machine Managed Switch – Network segmentation by 3 VLANs |
| 14/05/2024 | Added/changed: – Starlink as internet connectivity – 4th VLAN (guests) – 3rd Proxmox Server for HA – 2nd Pihole server – Migrated two Raspberry Pi’s to LXC on Proxmox |
| 20/05/2024 | Added/changed: – added new GenAI Server – new RAID 1 SSD Network Attached Storage (NAS) – added Immich as photo-cloud-sync – Additional ventilation for heat flow (cooling) |
Introduction
Over the past few weeks/ months, I’ve been diligently enhancing my home lab with an array of new components, all geared towards enhancing my ability to experiment, test, and optimize my home environment. This revamped setup now enables me to seamlessly delve into the world of virtualization, effortlessly spinning up and tinkering with virtual servers (VMs), Docker containers, and a GenAI server with Ollama. As of today (20/05/2024), here’s a snapshot of what my setup looks like. However, it’s important to note that this setup is a dynamic work in progress; it’s constantly evolving and improving. And fear not – proper cable management is next on the agenda, slated to be tackled in the coming weeks! Stay tuned for more updates as my home lab continues to evolve.
Let me break down what currently runs on what:
Internet Connection
I’ve set up my home lab using a Starlink internet connection provided by SpaceX, which offers download speeds of 250-400 Mbit/s and upload speeds of 50-100 Mbit/s. Compared to my previous speeds of 30 Mbit/s download and only 15 Mbit/s upload, this represents a tenfold increase in performance. Starlink is a satellite internet constellation being constructed by SpaceX, a company founded by Elon Musk. The goal of Starlink is to provide high-speed internet access to underserved and remote areas around the world, as well as to provide a global broadband network.
The constellation consists of small satellites called Starlink satellites, which are designed to operate in low Earth orbit (LEO). These satellites communicate with ground stations and with each other using radio frequencies, creating a network that can deliver internet connectivity to users on the ground.
Currently over 3,000 Starlink satellites are in orbit, crazy right

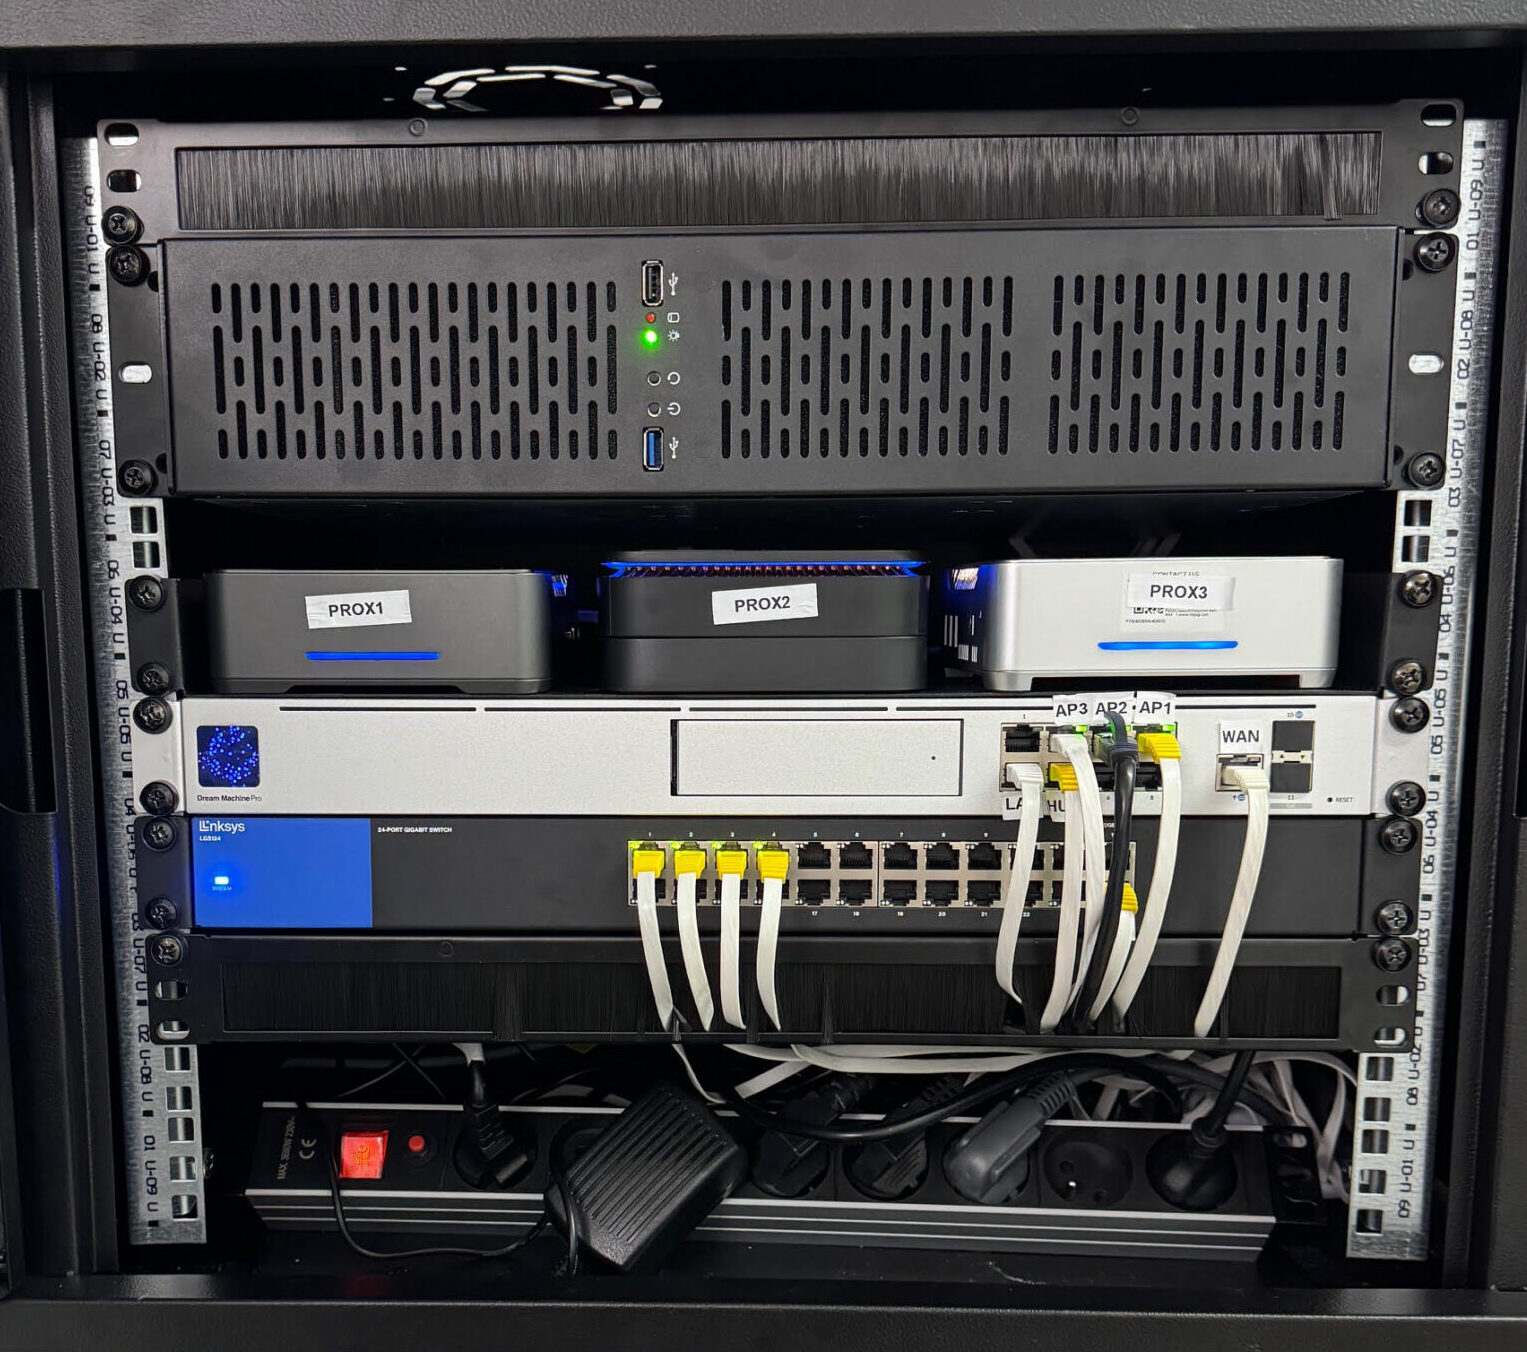
Switch: Unify Dream Machine Professional
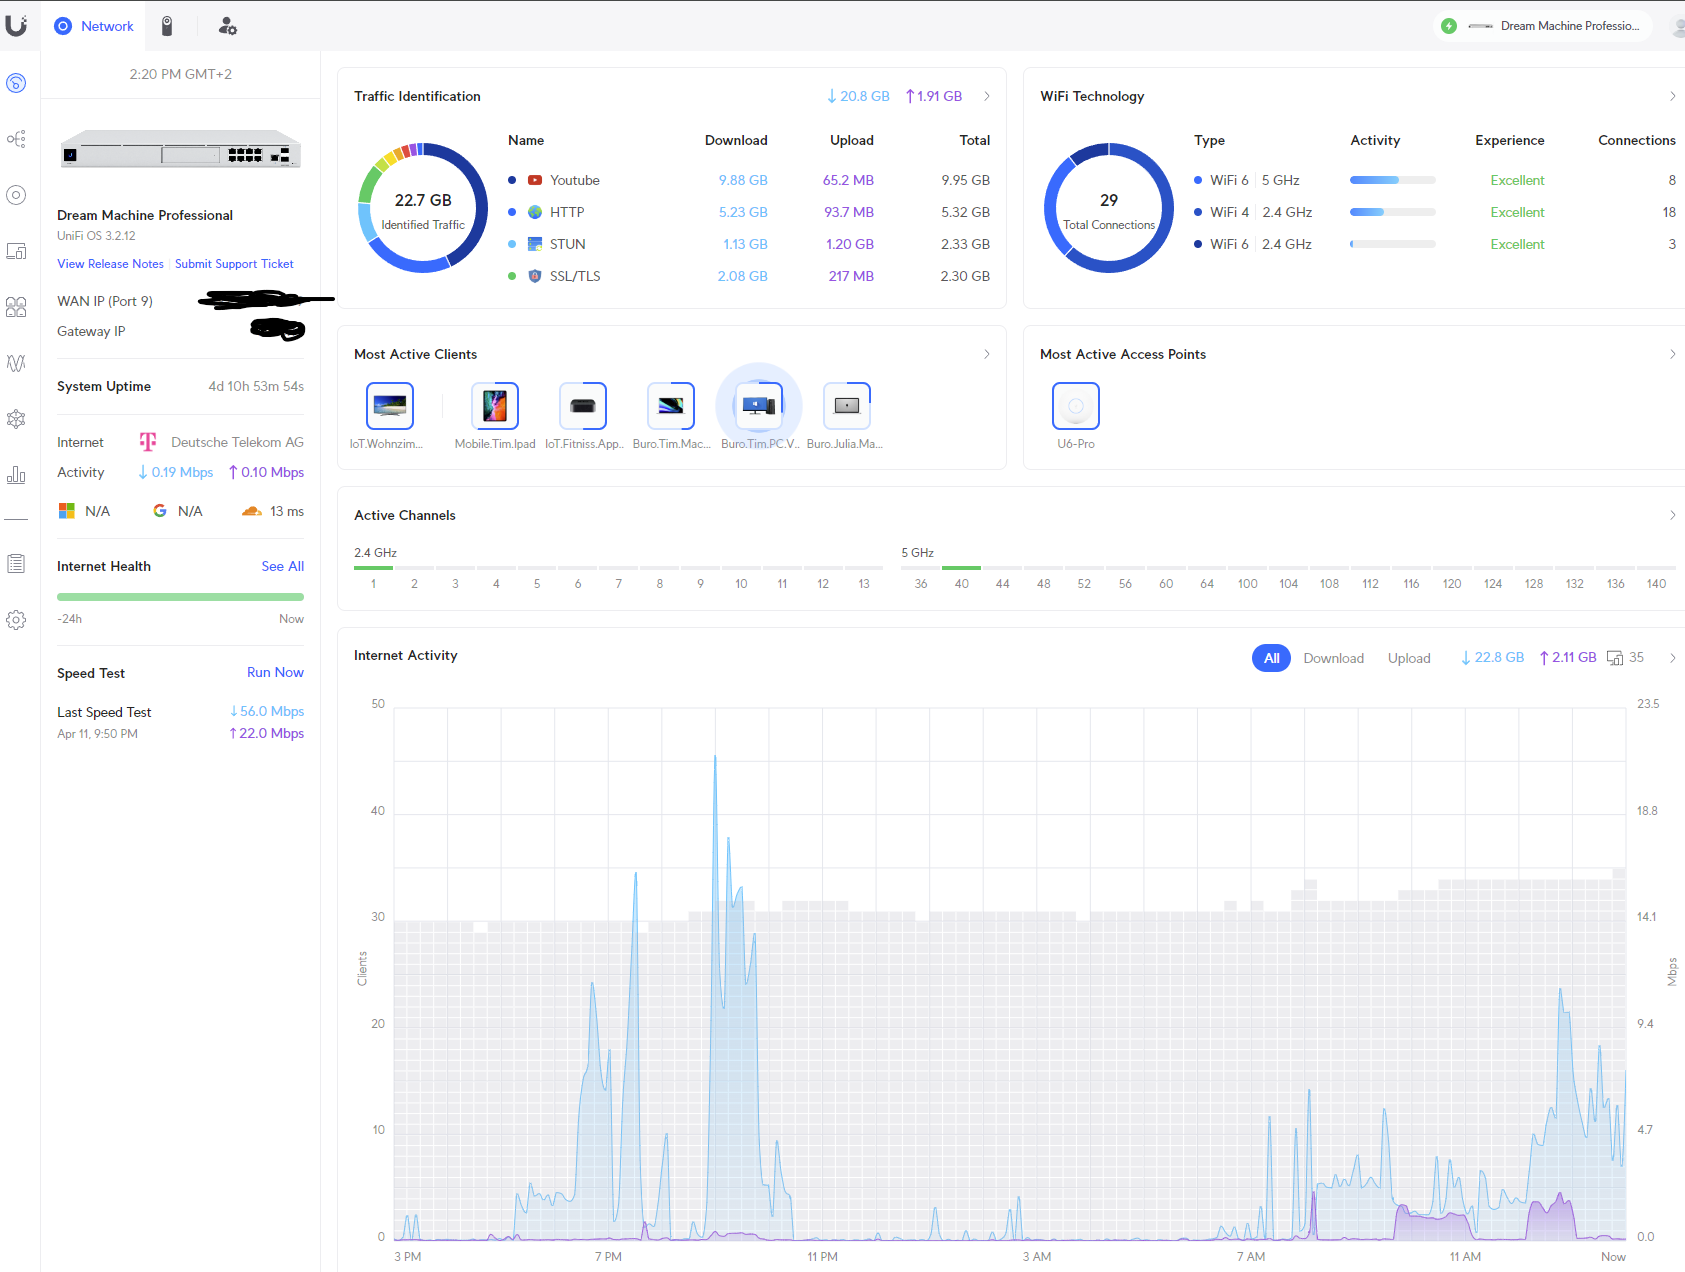
Recently, I expanded my homelab setup with the addition of the Unifi Dream Machine Professional switch, a pivotal step that offered enhanced network management capabilities and a more comprehensive view of my network infrastructure. I rely on my Dream Machine as the backbone of my DSL connection. Its consistent delivery of a stable and seamless internet connection has consistently proven its worth. The router serves one additional crucial function—it maintains a constant link to NoIP, ensuring a DNS name is always associated with my ever-changing IP address.This upgrade empowered me to implement Virtual LANs (VLANs), a crucial feature for segmenting and organizing my network effectively. Please note, I currently have more than 45 devices accross all 3 VLANs.
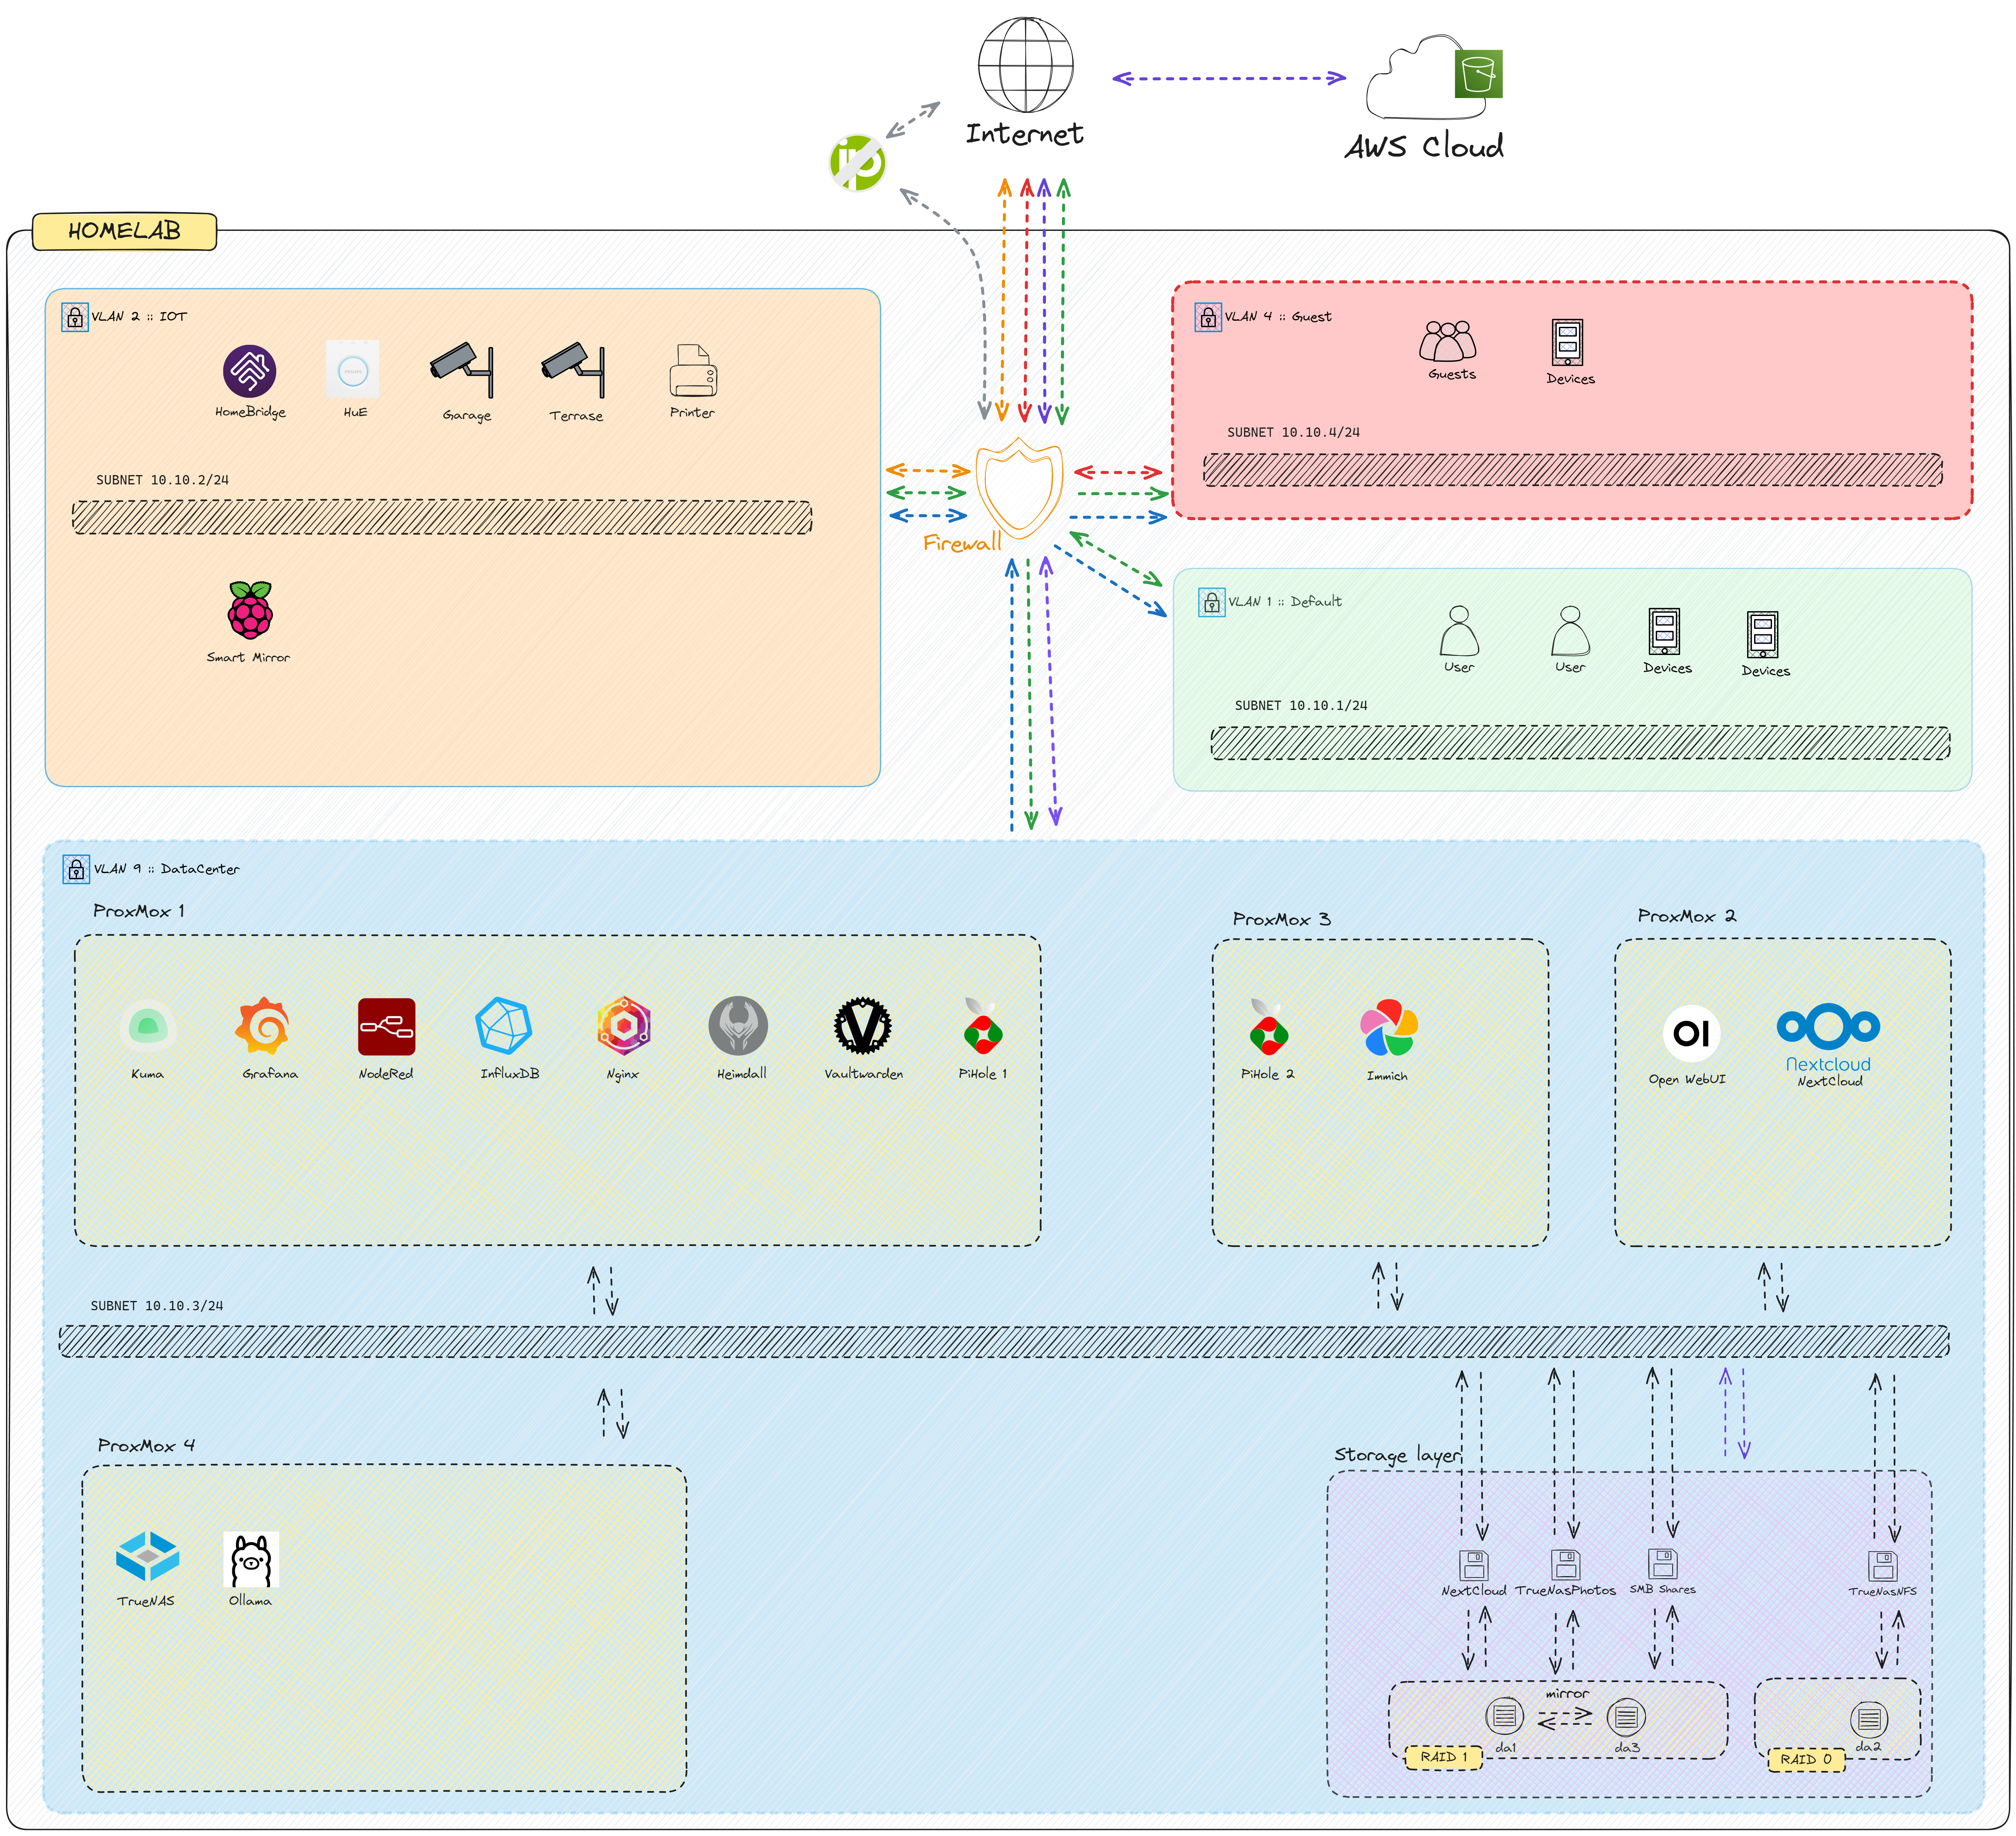
I configured three distinct VLANs to cater to different use-cases, each meticulously designed to optimize security and functionality:
- VLAN1 – Default: This VLAN serves as the hub for all my home devices and equipment, encompassing personal laptops, desktops, tablets, smartphones, and more. With unrestricted connectivity to other VLANs and direct access to the internet (albeit behind a firewall), VLAN1 ensures seamless communication for everyday tasks without imposing stringent network restrictions.
- VLAN2 – IoT (Internet of Things): In response to the proliferation of IoT devices in modern households, I established VLAN2 as a dedicated enclave for these interconnected gadgets. By isolating IoT devices from my personal devices and homelab infrastructure, VLAN2 mitigates potential security risks associated with diverse manufacturers and vulnerabilities. This strict separation safeguards my home network, ensuring that even in the event of a compromised IoT device, access to personal devices remains protected.
- VLAN3 – Datacenter (DC): Designed as a secure enclave for my homelab servers, VLAN3 boasts meticulously crafted inbound and outbound rules to regulate communication with other subnets. Access to VLAN3 is tightly controlled, with only essential ports permitted for connectivity, and stringent internet access rules in place to minimize exposure. By isolating my homelab servers within VLAN3, I bolster the overall security posture of my network, safeguarding sensitive data and infrastructure from potential threats.
- VLAN4 – Guest: Designed to provide a secure, throttled, and private connection to the internet, this VLAN is completely separated from all other VLANs and has the majority of websites blacklisted. The goal of this VLAN is to enable guests, even those with potentially compromised devices, to connect to the internet without exposing my network. Additionally, the network speed is throttled to only 5 Mbit/s download. Guests are sure to appreciate this.
In essence, the implementation of VLANs, facilitated by the Unifi Dream Machine Professional switch, has transformed my homelab into a resilient and well-organized network environment. Each VLAN serves a specific purpose, balancing connectivity and security to ensure optimal performance and protection.
WIFI: 1x Unify Access Point (Long-Reach) 2x Unify Access Point (Pro)
Those devices boasts full 2.4GHz and 5GHz WiFi 6 capabilities, providing an extended reach throughout my household. Its advanced technology not only replaces the need for five separate Fritzbox access points scattered throughout my home but also delivers superior and faster wireless internet connectivity.
With this single device, I’ve streamlined my network infrastructure while enhancing the overall wireless experience. Leveraging its capabilities, I’ve configured two distinct wireless networks to cater to different needs:
- “Blackhole”: This network is connected to VLAN1 – Default, providing unrestricted access to my home devices and equipment. Users can enjoy seamless connectivity while benefiting from the full potential of the WiFi 6 technology.
- “Blackhole IoT”: Limited to WiFi 4 and bound by the policies and restrictions of VLAN2 – IoT, this network offers a secure environment for Internet of Things devices. By isolating IoT devices from my personal devices and homelab infrastructure, I mitigate potential security risks and ensure the integrity of my network.
- “Guest“: A fully separated VLAN for guests, providing only internet access without any access to local devices.
The seamless integration of this access point with my Unifi Dream Machine has proven to be a worthwhile upgrade. Together, they provide a robust and efficient network solution that meets the demands of modern connectivity. With improved coverage, enhanced performance, and tailored network segmentation, this setup exemplifies the power of strategic network design and technology integration.
Switch: Linksys EU 24 Port Unmanaged Gb Switch
As my homelab steadily grows and evolves, the demand for network connectivity and expansion becomes increasingly pressing. Recognizing the limitations of my existing hardware, particularly the finite number of ports on my Fritzbox router, I knew it was time to augment my network infrastructure.
The Linksys unmanaged switch—a simple yet indispensable solution that seamlessly integrates into my network, providing an additional 24 Gigabit Ethernet ports to accommodate the expanding array of devices and services in my homelab.
NoIP Dynamic DNS

Dealing with Starlink’s frequent changes to my external IPv4 IP address posed a challenge, particularly in maintaining consistent access to my home network from external sources. However, I found a reliable solution through NoIP, which offers a dynamic DNS (DDNS) service that seamlessly integrates with my Fritzbox router.
With the NoIP service configured on my router, it continually monitors for changes in my external IP address. When Starlink assigns a new IP address, NoIP promptly updates my registered domain name to reflect the change. This dynamic updating process ensures that I always have a static hostname pointing to my ever-changing external IP address.
This setup not only provides me with consistent access to my home network’s services, such as remote desktop or file sharing, but also simplifies the process for accessing my network from anywhere in the world. Whether I’m traveling or working remotely, I can rely on my custom domain name to connect securely to my home network, regardless of any fluctuations in my external IP address.
Philips HUE Bridge
Since the Philips HUE Bridge necessitates a LAN connection, it holds the distinction of being the first device in my home lab to receive a dedicated LAN port. This bridge serves as the central hub, connecting all our Philips smart home equipment to the internet. Currently, our smart home ecosystem is managed through HOME from Apple, although there’s a possibility of transitioning to a different home automation platform in the near future. By seamlessly integrating the HUE Bridge into our network infrastructure, we’ve unlocked a world of possibilities for controlling and automating our lighting and other connected devices, enhancing both convenience and efficiency within our home environment.
Mini PC (PROX1): Proxmox hypervisor
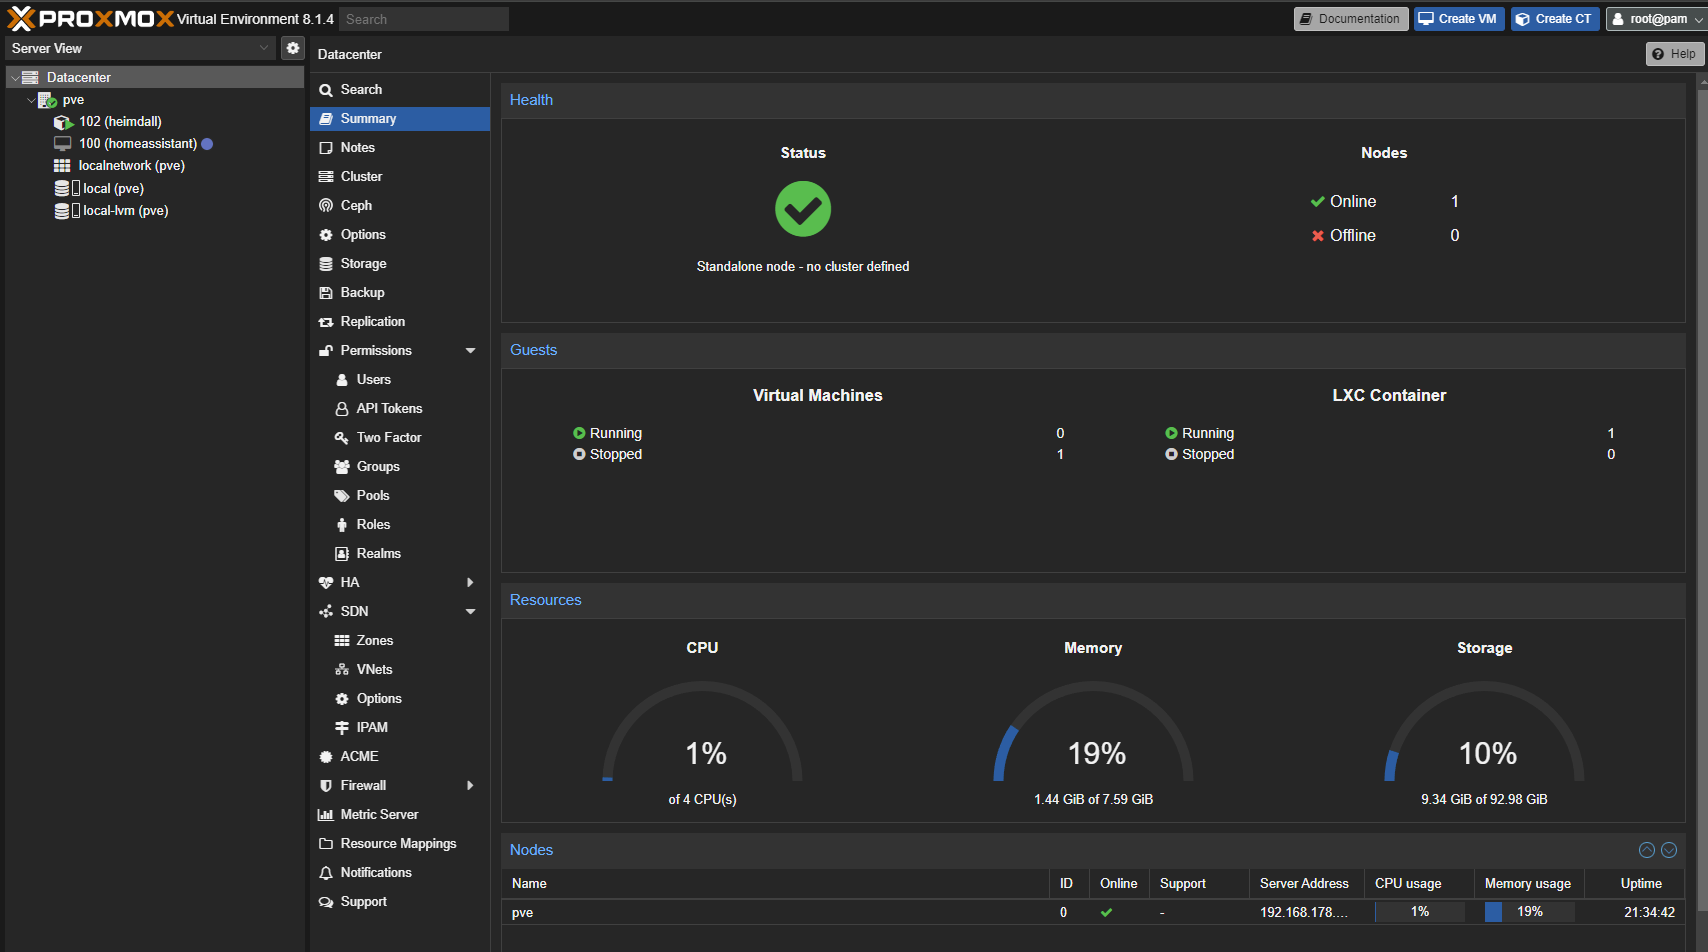
Initially, the mini PC was running a Windows operating system, but I later opted to switch to Proxmox. Proxmox offers a versatile platform for installing, testing, and managing various virtual machines and containers, providing me with greater flexibility and control over my home lab environment. At present, I have three virtual machines installed, which runs
heimdall: a tool that facilitates the creation of a real-time homepage for monitoring and managing aspects of the home lab. This setup not only streamlines access to vital information about the lab’s performance but also serves as a testament to the power and adaptability of Proxmox in optimizing home lab functionality. Most likely I will replace this device with a much more powerfull one.
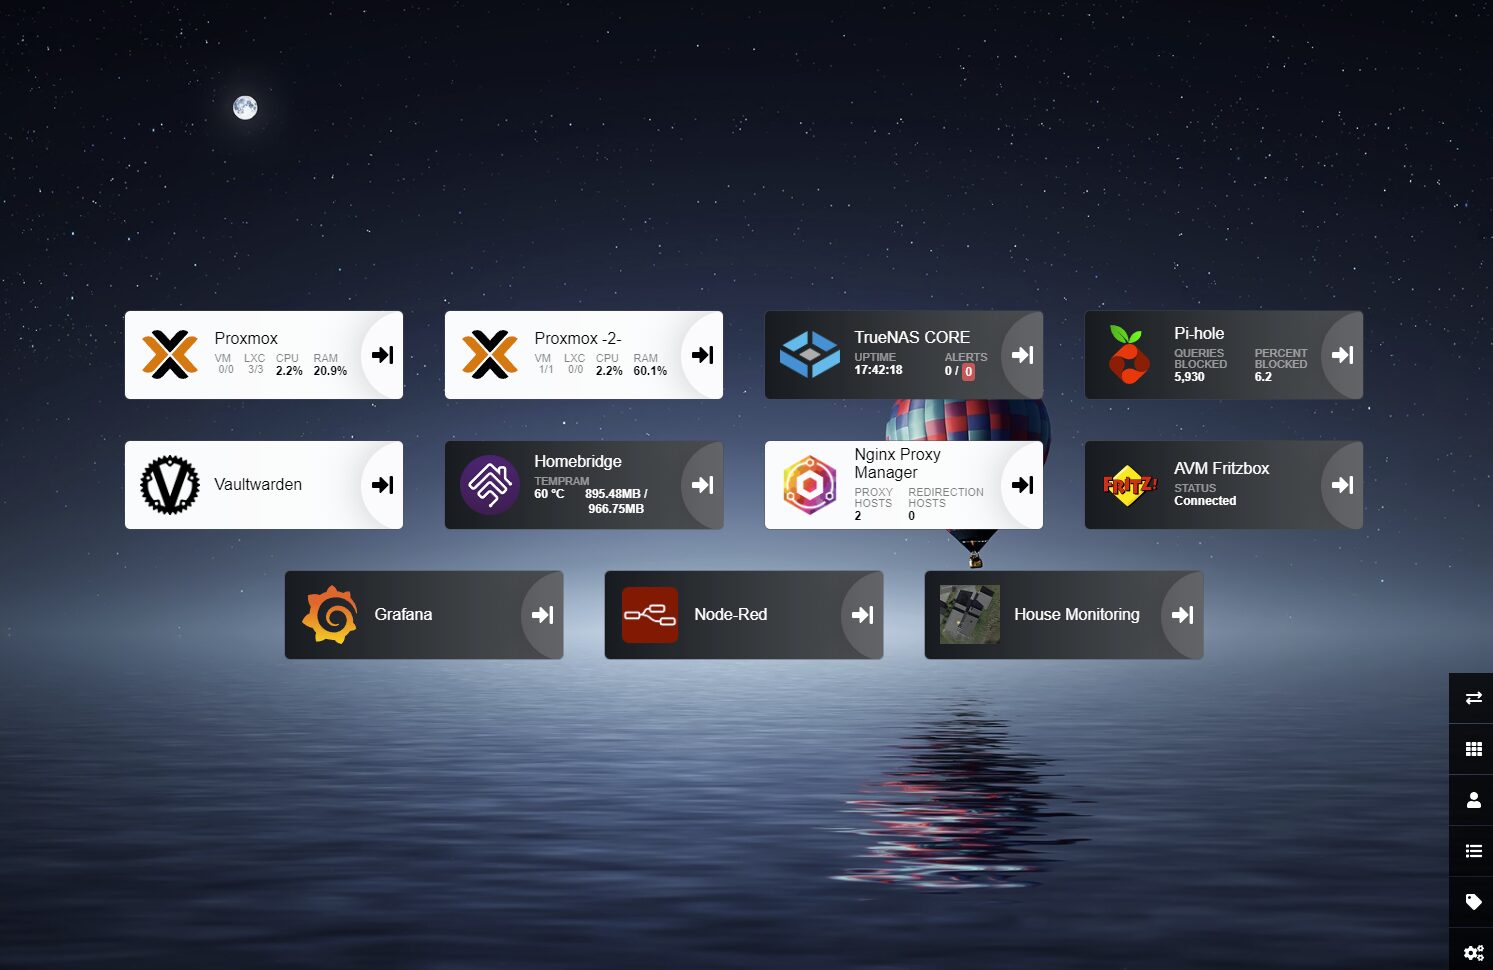
Nginx Proxy Manager: is a Proxy Manager that offers a comprehensive solution that streamlines management, fortifies security, and optimizes performance—all with an intuitive interface and powerful features. It enables me to orchestrate routing through a local proxy to my different servers/ services.

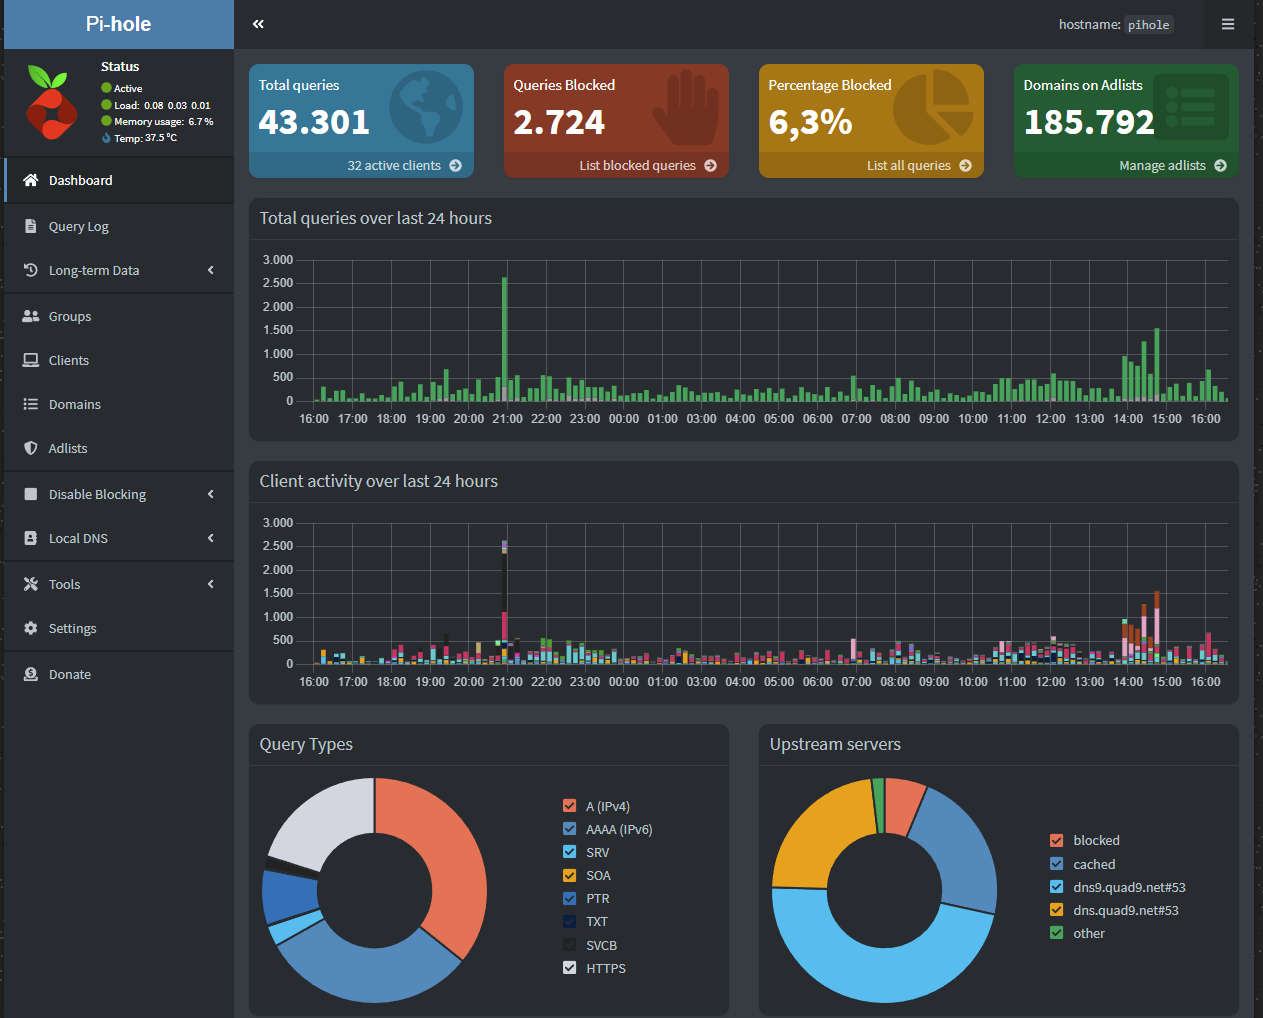
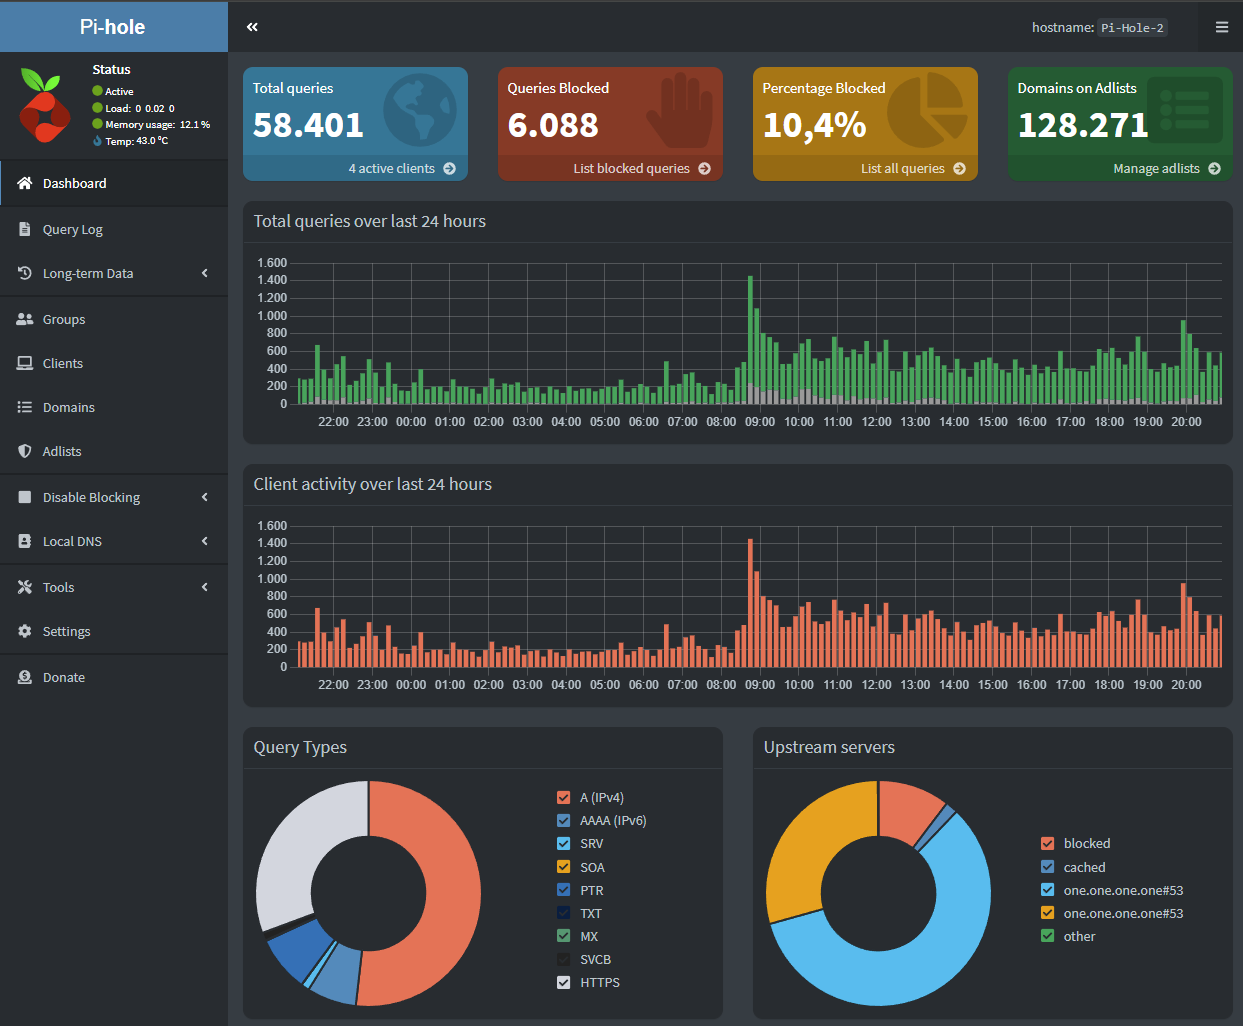
Pi-Hole: Pi-Hole serves as a network-wide ad blocker, intercepting DNS requests and blocking connections to known ad-serving domains. This means fewer ads on all devices connected to your network, including computers, smartphones, tablets, and smart TVs. By eliminating intrusive advertisements, Pi-Hole enhances your browsing experience, reduces distractions, and improves page load times.
Vaultwarden: is a self-hosted password manager, allowing users to securely store and manage their passwords and sensitive information. It provides end-to-end encryption, ensuring data privacy and security. Really cool service as it works with bitwarden on my mac and windows machines. Please note the image below is an example, not a screenshot of my own setup due to security reasons.

MQTT Server: MQTT (Message Queuing Telemetry Transport) is a lightweight messaging protocol ideal for IoT (Internet of Things) applications. The MQTT server facilitates communication between various devices and sensors within my home network, allowing seamless data exchange and coordination.
Node-RED: Node-RED is a flow-based programming platform that simplifies the process of wiring together hardware devices, APIs, and online services. With Node-RED, I can easily create visual workflows to automate tasks, process data, and integrate different components of my smart home ecosystem.

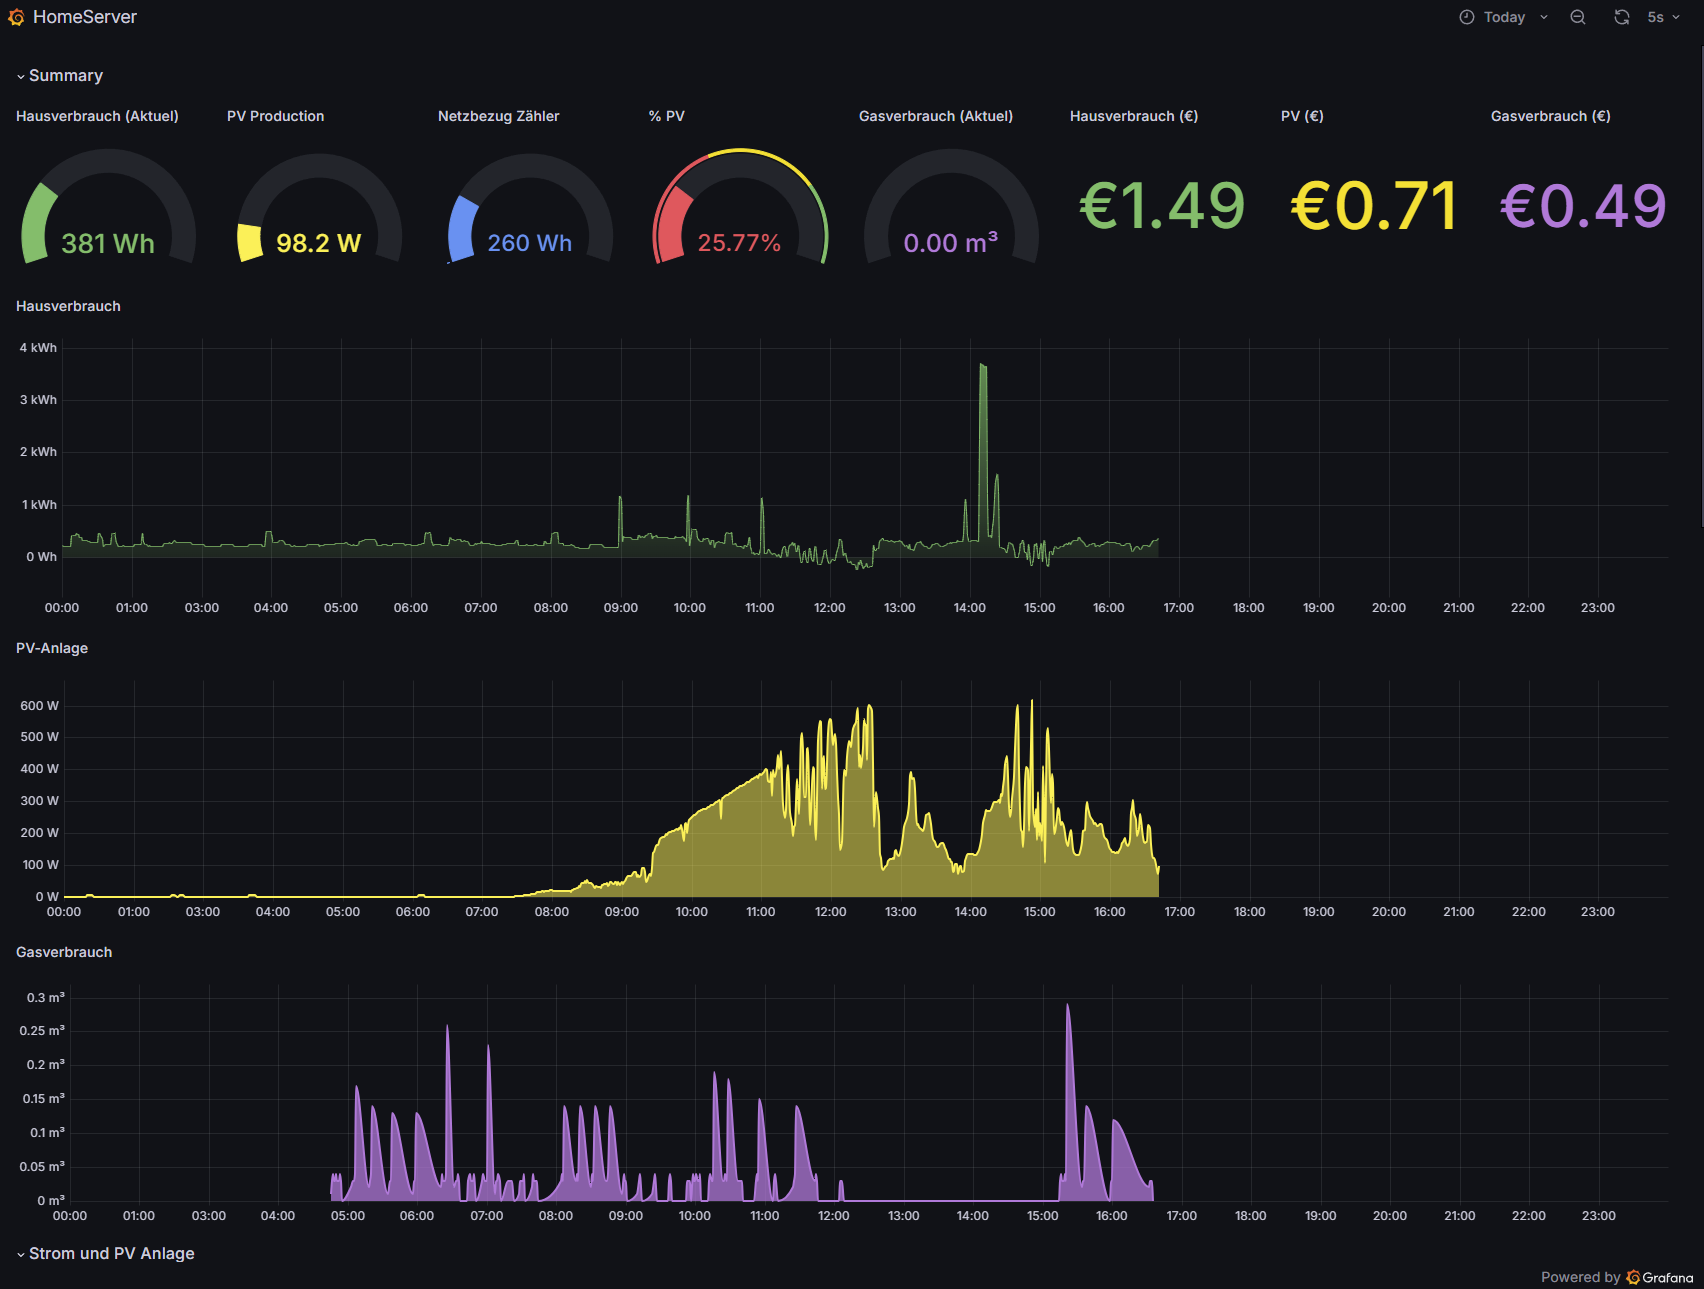
InfluxDB: InfluxDB is a time-series database optimized for handling high volumes of timestamped data. It serves as the central repository for storing and querying data related to my house’s power generation, consumption, and gas usage. This data is crucial for tracking trends, identifying inefficiencies, and making informed decisions to optimize energy usage and reduce costs.
Grafana: Grafana is a powerful open-source analytics and visualization platform that transforms data into actionable insights. With Grafana, I can create dynamic dashboards and charts to monitor real-time metrics, analyze historical data, and gain valuable insights into my home’s energy usage patterns.
Together, these components form a robust monitoring and analytics system that empowers me to track, analyze, and optimize my home’s energy usage and efficiency. More information can be found here
A second dashboard shows me the performance of my Proxmox server(s):

Mini PC (PROX2): Proxmox hypervisor 2
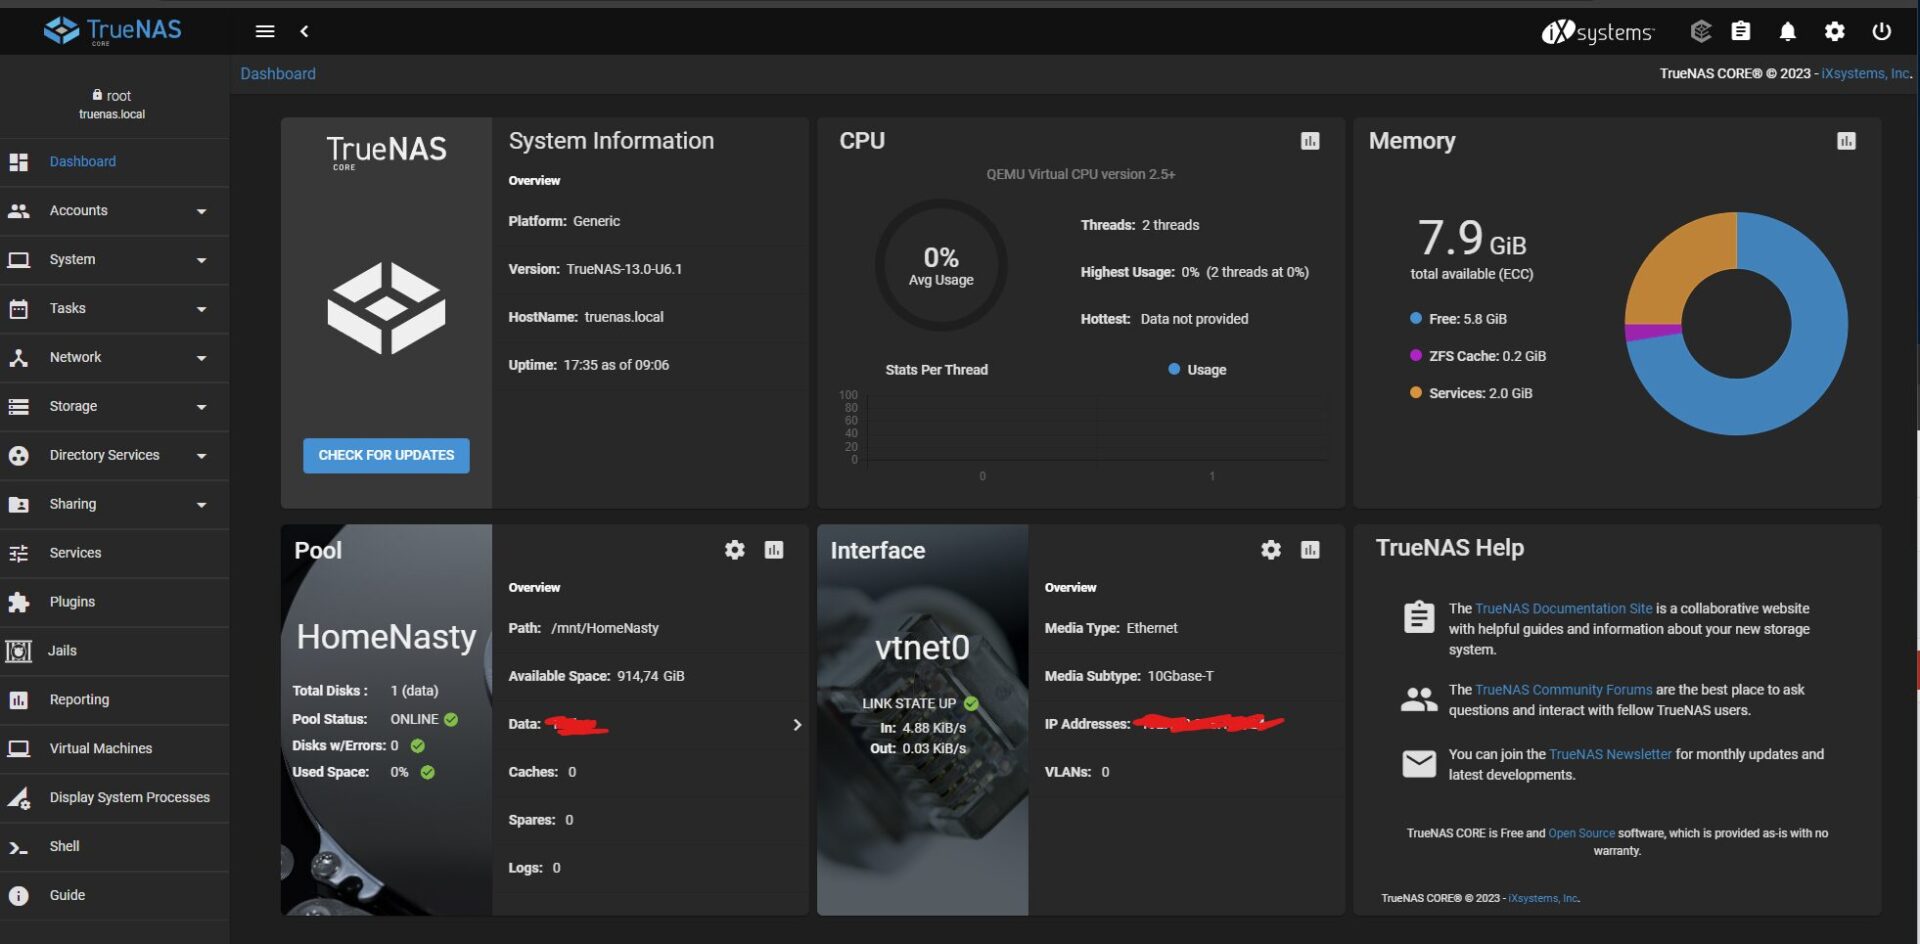
Recently, I acquired a second mini PC with enhanced performance to serve as a Proxmox high-availability cluster alongside my existing mini PC, PROX1, and PROX3 (as for high-availability, 3 nodes are required). This setup will support TrueNAS, an open-source network-attached storage (NAS) operating system, enabling me to establish a centralized storage solution for my network. TrueNAS boasts features like file sharing, data backup, and data protection, catering to both home and enterprise environments.
TrueNAS: What sets TrueNAS apart is its ability to seamlessly backup local data to the AWS Cloud (S3 storage) on an hourly, daily, or weekly basis. This ensures that in the event of hardware failure or unforeseen disasters, a complete backup is readily available on AWS S3. This feature provides peace of mind, knowing that my data remains secure and accessible, even in the face of unexpected challenges.
In AWS, I’ve meticulously configured multiple S3 buckets, each dedicated to specific use cases, aligning with the diverse needs of my network and data management strategy. This granular approach allows me to efficiently manage storage allocations, track changes, and maintain control over the data being handled by TrueNAS.
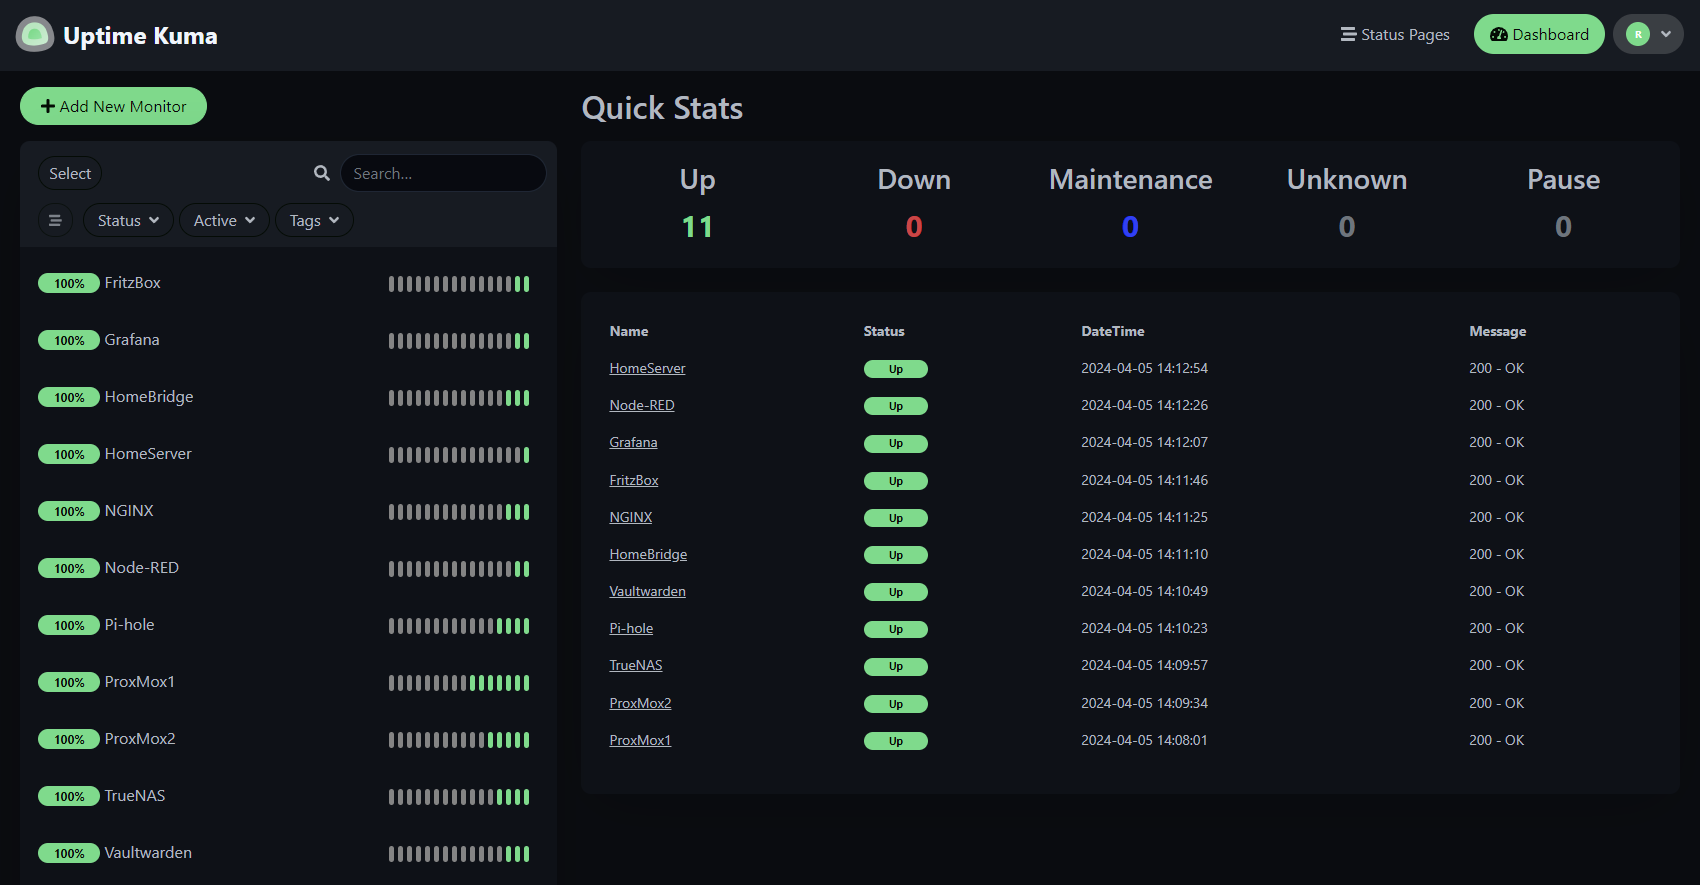
Uptime Kuma: is a game-changer in homelab monitoring. This open-source service, housed within a Docker container, keeps a vigilant eye on the health of my network. With a comprehensive overview of server and service statuses, it ensures that I stay informed about any potential issues. Plus, its alert system, seamlessly integrated with my email, guarantees timely notifications, allowing me to address issues promptly and maintain the smooth operation of my homelab.
Mini PC (PROX3): Proxmox hypervisor 3 (HA)
The third Proxmox server is dedicated to two specific functions: Firstly, it acts as a high-availability (HA) server for all virtual servers hosted on prox1 and prox2. This ensures uninterrupted service and redundancy in case of hardware or software failures on the primary servers. On Prox3, there is a dedicated virtual machine that acts as a quorum client (as you need three nodes to vote if one server is down).

Secondly, it serves as a secondary Pi-Hole instance to ensure internet connectivity in case Pi-Hole 1 becomes unreachable or goes down for any reason. This redundancy not only enhances network reliability but also provides a fail-safe mechanism to maintain ad-blocking and DNS filtering services, crucial for network security and privacy.
Immich: It is a self-hosted photo and video management solution that runs in a Docker container. I’ve set this up as a dedicated storage dataset on my NAS, with all my photos and videos mirrored across two SSDs. A super cool feature of Immich is that it has a dedicated app for your mobile devices that continuously syncs your photos and videos over the internet (or WLAN). This way, your most important photos and videos are stored on your own “cloud” instead of Google, Apple, or other alternatives. ps. the picture below is from immich demo site as I do not intend to share personal pictures here -.-

Raspberry Pi: Smart Mirror + Home Bridge
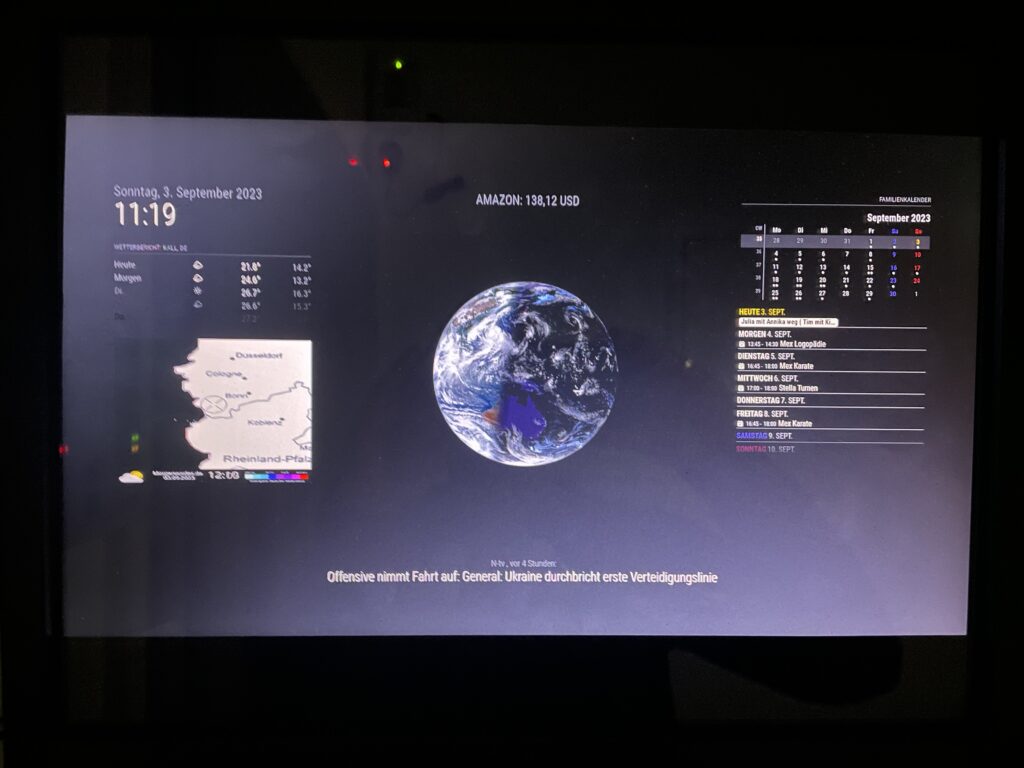
Finally, tucked away discreetly behind a screen in our hallway is my third Raspberry Pi, a silent but indispensable part of our home setup. This Raspberry Pi serves as a dynamic information hub, providing me with daily updates on upcoming appointments, weather forecasts, stock updates, and more. Its presence in a high-traffic area ensures that essential information is readily accessible to me and my family as we go about our daily routines.
Additionally, this Raspberry Pi hosts Home Bridge, a versatile software platform that bridges the gap between my non-HomeKit-compatible smart home devices and Apple’s HomeKit ecosystem. With Home Bridge, I can seamlessly integrate a wide range of smart home accessories into my HomeKit setup, allowing for centralized control and automation through Apple’s Home app and Siri voice commands.
What’s particularly remarkable about Home Bridge is its extensive plugin ecosystem, boasting over 2,000 plugins supporting thousands of different smart accessories. This vast library of plugins ensures compatibility with a diverse array of devices, enabling me to customize and expand my smart home ecosystem according to my preferences and needs.
Here is a full post on my smartmirror.
What’s next?
… stay posted.