
After completing my first AWS certifications, I aimed to initiate my inaugural project incorporating coding, hardware, and AWS services. By chance, I stumbled upon Jeff Barr’s “Ambient Information Display” project, prompting me to explore further examples such as the “Smart Mirror” project, which I found linked in German.
Disclaimer: While numerous blogs and videos offer guidance on installing, configuring, and setting up Smart Mirrors or Smart Monitors, this account does not serve as one. Instead, it presents my personal experience, which may contain flaws and incomplete information.
Objectives
- looks
- needs to look nice (if possible, a mirror
- Functionality
- Get details on wetter forecast
- Get visibility on our calanders (my personal one, and the real one, of my wife)
- News
- Stocks
- Public Holidays
- birthdays
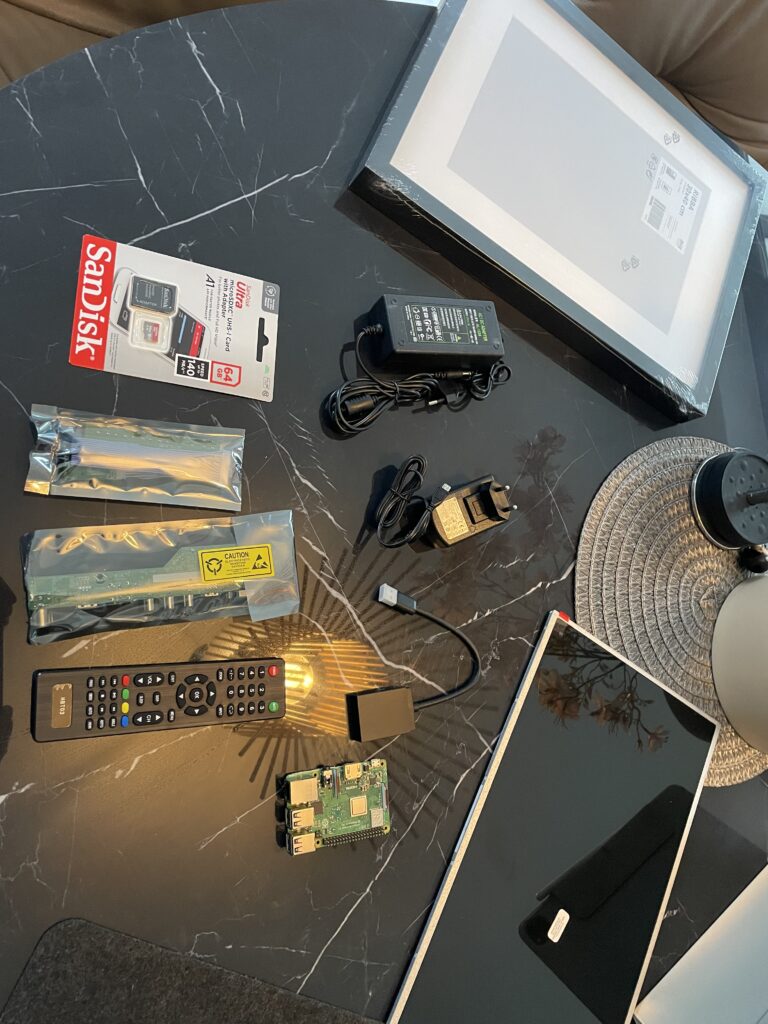
Step 1: Hardware
Here is the list of items I purchased on Amazon. Please note that I do not receive any benefits if you make purchases using the links provided below:
- Display: https://www.amazon.de/dp/B0CBYCD96F?psc=1&ref=ppx_yo2ov_dt_b_product_details
- Display Controller: https://www.amazon.de/dp/B0786FSJHX?psc=1&ref=ppx_yo2ov_dt_b_product_details
- Display D/C Adapter: https://www.amazon.de/dp/B07N197JH8?ref=ppx_yo2ov_dt_b_product_details&th=1
- IKEA frame: https://www.amazon.de/dp/B0BW8VP5FZ?psc=1&ref=ppx_yo2ov_dt_b_product_details
- Micro SD Card: https://www.amazon.de/dp/B0B7NXBM6P?ref=ppx_yo2ov_dt_b_product_details&th=1
- Raspberry Pi 3 1GB: https://www.amazon.de/dp/B07BFH96M3?psc=1&ref=ppx_yo2ov_dt_b_producat_details
- Raspberry Pi3 D/C Adapter: https://www.amazon.de/dp/B01DP8O5A4?ref=ppx_yo2ov_dt_b_product_details&th=1
- HDMI Cable: https://www.amazon.de/dp/B07KSP1SMS?psc=1&ref=ppx_yo2ov_dt_b_product_details
- Mirror-Glass: https://www.brigla-shop.de/spiegel-smart-mirror
Step 2: What Software?
After conducting some research, I discovered a promising software solution called “MagicMirror2.” It boasts a robust community that offers support and various modules for customizing your display. MagicMirror2 is an open-source smart mirror platform with abundant resources including YouTube videos and developer documentation.
Step 3: Let’s get started
After a few days, all the components arrived, and I began assembling everything. The setup proved to be straightforward to connect and power up. Installing the Raspberry Pi with the MagicMirror software was also a breeze, thanks to the numerous online tutorials available. Once the software was installed, we eagerly beheld our first glimpse of the setup in action.
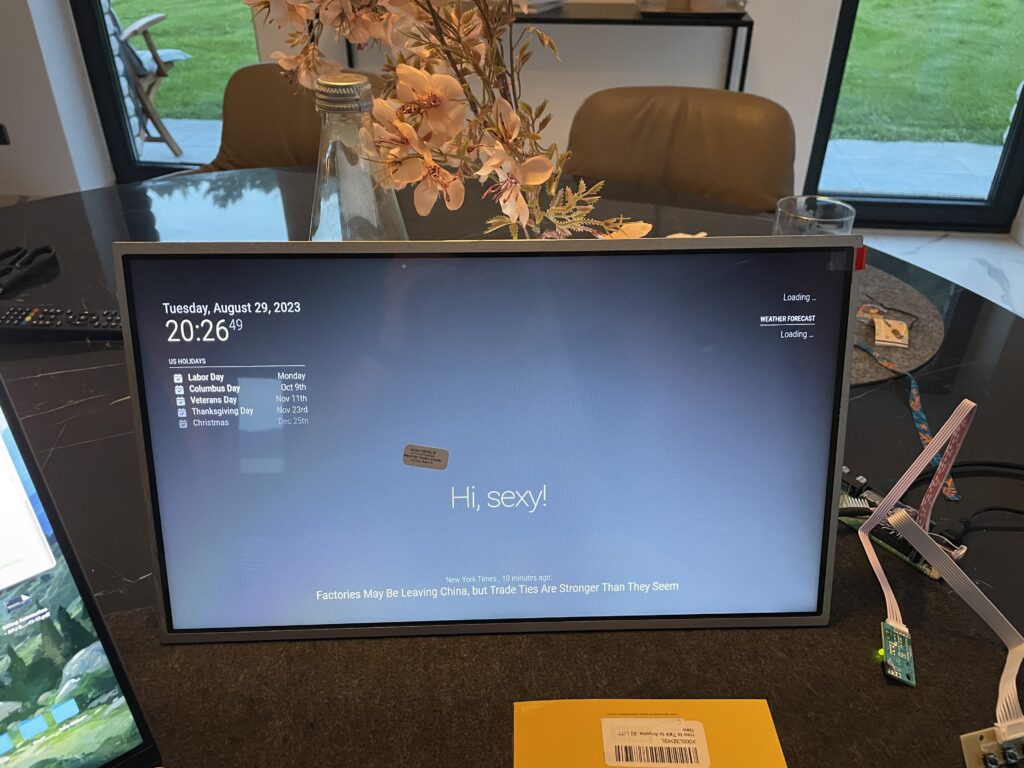
As evident, the software already boasts several enabled features (modules), including:
- Time and date
- Weather forecast
- US holidays
- Newsflash from The New York Times
Below is the original content of the config.js file (the latest version is available here):
</p>
<!-- /wp:paragraph -->

<!-- wp:syntaxhighlighter/code -->
<pre class="wp-block-syntaxhighlighter-code">/* MagicMirror² Config Sample
 *
 * By Michael Teeuw https://michaelteeuw.nl
 * MIT Licensed.
 *
 * For more information on how you can configure this file
 * see https://docs.magicmirror.builders/configuration/introduction.html
 * and https://docs.magicmirror.builders/modules/configuration.html
 *
 * You can use environment variables using a `config.js.template` file instead of `config.js`
 * which will be converted to `config.js` while starting. For more information
 * see https://docs.magicmirror.builders/configuration/introduction.html#enviromnent-variables
 */
let config = {
 address: "localhost", // Address to listen on, can be:
 // - "localhost", "127.0.0.1", "::1" to listen on loopback interface
 // - another specific IPv4/6 to listen on a specific interface
 // - "0.0.0.0", "::" to listen on any interface
 // Default, when address config is left out or empty, is "localhost"
 port: 8080,
 basePath: "/", // The URL path where MagicMirror² is hosted. If you are using a Reverse proxy
    // you must set the sub path here. basePath must end with a /
 ipWhitelist: ["127.0.0.1", "::ffff:127.0.0.1", "::1"], // Set [] to allow all IP addresses
 // or add a specific IPv4 of 192.168.1.5 :
 // ["127.0.0.1", "::ffff:127.0.0.1", "::1", "::ffff:192.168.1.5"],
 // or IPv4 range of 192.168.3.0 --> 192.168.3.15 use CIDR format :
 // ["127.0.0.1", "::ffff:127.0.0.1", "::1", "::ffff:192.168.3.0/28"],

 useHttps: false,  // Support HTTPS or not, default "false" will use HTTP
 httpsPrivateKey: "",  // HTTPS private key path, only require when useHttps is true
 httpsCertificate: "",  // HTTPS Certificate path, only require when useHttps is true

 language: "en",
 locale: "en-US",
 logLevel: ["INFO", "LOG", "WARN", "ERROR"], // Add "DEBUG" for even more logging
 timeFormat: 24,
 units: "metric",

 modules: [
 {
 module: "alert",
 },
 {
 module: "updatenotification",
 position: "top_bar"
 },
 {
 module: "clock",
 position: "top_left"
 },
 {
 module: "calendar",
 header: "US Holidays",
 position: "top_left",
 config: {
 calendars: [
 {
 fetchInterval: 7 * 24 * 60 * 60 * 1000,
 symbol: "calendar-check",
 url: "https://ics.calendarlabs.com/76/mm3137/US_Holidays.ics"
 }
 ]
 }
 },
 {
 module: "compliments",
 position: "lower_third"
 },
 {
 module: "weather",
 position: "top_right",
 config: {
 weatherProvider: "openweathermap",
 type: "current",
 location: "New York",
 locationID: "5128581", //ID from http://bulk.openweathermap.org/sample/city.list.json.gz; unzip the gz file and find your city
 apiKey: "YOUR_OPENWEATHER_API_KEY"
 }
 },
 {
 module: "weather",
 position: "top_right",
 header: "Weather Forecast",
 config: {
 weatherProvider: "openweathermap",
 type: "forecast",
 location: "New York",
 locationID: "5128581", //ID from http://bulk.openweathermap.org/sample/city.list.json.gz; unzip the gz file and find your city
 apiKey: "YOUR_OPENWEATHER_API_KEY"
 }
 },
 {
 module: "newsfeed",
 position: "bottom_bar",
 config: {
 feeds: [
 {
 title: "New York Times",
 url: "https://rss.nytimes.com/services/xml/rss/nyt/HomePage.xml"
 }
 ],
 showSourceTitle: true,
 showPublishDate: true,
 broadcastNewsFeeds: true,
 broadcastNewsUpdates: true
 }
 },
 ]
};

/*************** DO NOT EDIT THE LINE BELOW ***************/
if (typeof module !== "undefined") {module.exports = config;}
Step 4: Source Code Control
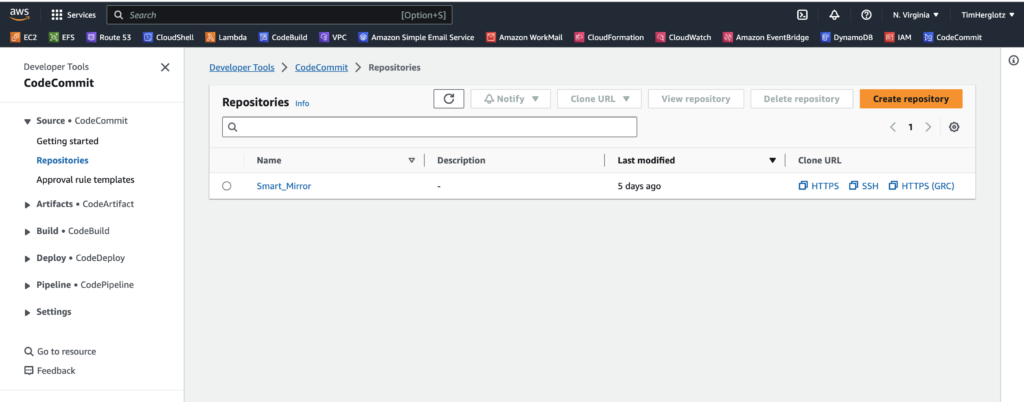
The source code, encompassing the entire setup of the Magic Mirror software, is stored on the micro SD card, which could potentially malfunction over time. Additionally, when modifying configuration files, I prefer to maintain versioning for tracking purposes. Hence, I opted to utilize AWS CodeCommit to store, track, and version control the files online. This service is publicly available and falls under the “AWS Free Tier” offering.
Having familiarity with standard Git commands such as “git commit,” “git add,” “git status,” “git push,” “git pull,” etc., I proceeded with configuring the setup. Eventually, the code was securely stored in AWS CodeCommit under a repository named “Smart_Mirror.”
Step 5: Configure the Magic Mirror
Once the source code was securely stored, I began configuring modules, incorporating new ones, and tailoring the design to meet my expectations in terms of functionality and aesthetics. Thanks to the extensive community support, which continually develops and maintains a plethora of modules, installing various modules proved to be straightforward and hassle-free.
- download the module through a command: “git clone”
- configure the config.js file to your personal needs.
Everything is thoroughly documented and can be found here: link to the GitHub repository. After investing several hours, I successfully completed the configuration, established connections to our online agendas, and everything is functioning perfectly.
Step 6: The final result
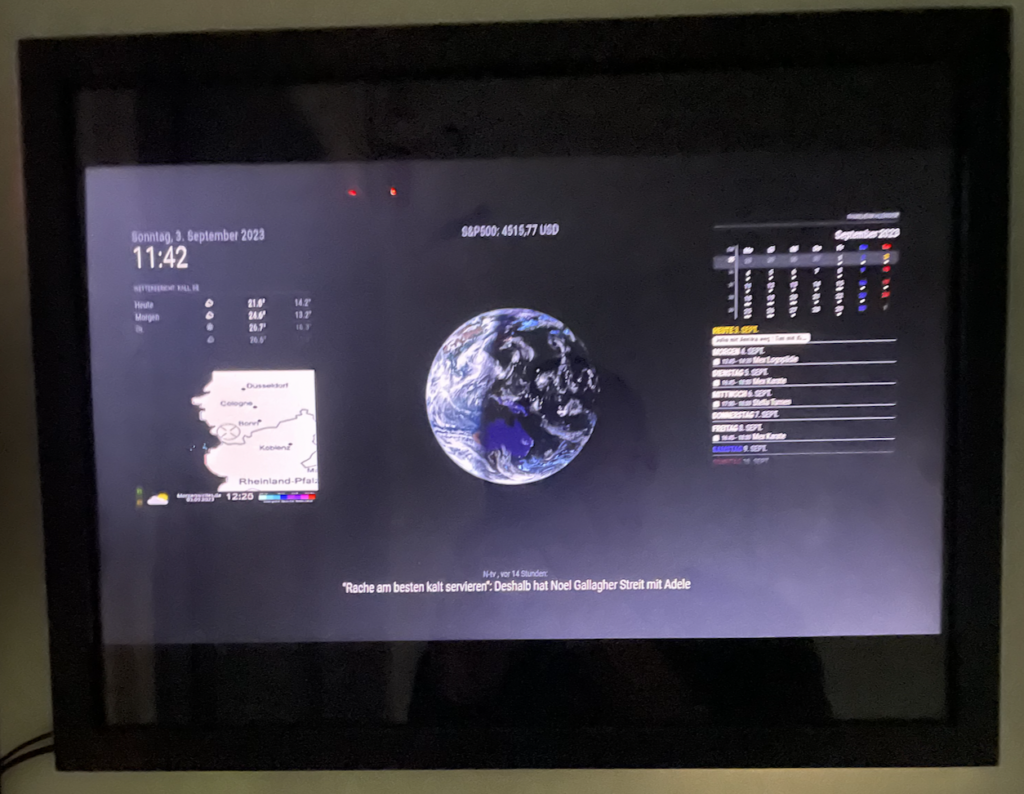
It displays the following information:
- Left
- Date and Time
- Weather forecast
- Rain Rader
- Middle
- Stock Ticker
- World
- German News Ticker
- Right
- Calendar
- Daily Agenda (Refreshed from two GMAIL calanders)
Here is my final configuration file, some API keys are secret links are displayed as “snip”:
</p>
<!-- /wp:paragraph -->
<!-- wp:syntaxhighlighter/code -->
<pre class="wp-block-syntaxhighlighter-code">/* MagicMirror² Config Sample
*
* By Michael Teeuw https://michaelteeuw.nl
* MIT Licensed.
*
* For more information on how you can configure this file
* see https://docs.magicmirror.builders/configuration/introduction.html
* and https://docs.magicmirror.builders/modules/configuration.html
*
* You can use environment variables using a `config.js.template` file instead of `config.js`
* which will be converted to `config.js` while starting. For more information
* see https://docs.magicmirror.builders/configuration/introduction.html#enviromnent-variables
*/
let config = {
address: "localhost", // Address to listen on, can be:
// - "localhost", "127.0.0.1", "::1" to listen on loopback interface
// - another specific IPv4/6 to listen on a specific interface
// - "0.0.0.0", "::" to listen on any interface
// Default, when address config is left out or empty, is "localhost"
port: 8080,
basePath: "/", // The URL path where MagicMirror² is hosted. If you are using a Reverse proxy
// you must set the sub path here. basePath must end with a /
ipWhitelist: ["127.0.0.1", "::ffff:127.0.0.1", "::1"], // Set [] to allow all IP addresses
// or add a specific IPv4 of 192.168.1.5 :
// ["127.0.0.1", "::ffff:127.0.0.1", "::1", "::ffff:192.168.1.5"],
// or IPv4 range of 192.168.3.0 --> 192.168.3.15 use CIDR format :
// ["127.0.0.1", "::ffff:127.0.0.1", "::1", "::ffff:192.168.3.0/28"],
useHttps: false, // Support HTTPS or not, default "false" will use HTTP
httpsPrivateKey: "", // HTTPS private key path, only require when useHttps is true
httpsCertificate: "", // HTTPS Certificate path, only require when useHttps is true
language: "de",
locale: "de-DE",
logLevel: ["INFO", "LOG", "WARN", "ERROR"], // Add "DEBUG" for even more logging
timeFormat: 24,
units: "metric",
modules: [
{
module: "alert",
},
{
module: "updatenotification",
position: "top_bar"
},
{
module: "clock",
position: "top_left"
},
{
module: "weather",
position: "top_left",
header: "Wetterbericht:",
config: {
weatherProvider: "openweathermap",
type: "forecast",
location: "Kall, DE",
locationID: "2893762", //ID from http://bulk.openweathermap.org/sample/city.list.json.gz; unzip the gz file and find your city
apiKey: "snip"
}
},
{
module: "MMM-Regenradar",
position: "top_left",
config: {
width: "400px", // rain radar width (in px or %)
height: "300px", // rain radar height (in px or %)
plz: "53925", // german postcode
delay: "70", // delay of the gif frames
type: "1", // type modus (0= rain clouds are usually green 1= rain clouds are usually blue)
zoomlvl: "4", // zoom level (1= whole germany)
bar: "0", // bar modus (0= whithout bar 1= bar is on)
map: "0", // map modus (0= white, only city names 1= colored, with details)
textcol: "ffffff", // text color (in hex color code)
bgcol: "00000", // background color (in hex color code)
updateInterval: 5, // update interval (in minutes)
}
},
/** {
module: "calendar",
position: "top_left",
config: {
broadcastPastEvents: true,
calendars: [
{
fetchInterval: 7 * 24 * 60 * 60 * 1000,
name: "Feiertage",
symbol: "calendar-check",
url: "https://onlinekalender.info/feiertage/deutschland/nordrhein-westfalen.ics",
broadcastPastEvents: true,
maximalNumberOfDays: 30,
MaximumEntries: 100
},
{
fetchInterval: 7 * 24 * 60 * 60 * 1000,
name: "Julia",
symbol: "calendar-check",
url: "https://calendar.google.com/calendar/ical/snip/basic.ics",
broadcastPastEvents: true,
maximalNumberOfDays: 30,
MaximumEntries: 100
},
{
fetchInterval: 7 * 24 * 60 * 60 * 1000,
url: "https://calendar.google.com/calendar/ical/snip/basic.ics",
name: "Tim",
symbol: "calendar-check",
broadcastPastEvents: true,
maximalNumberOfDays: 30,
MaximumEntries: 100
},
]
}
}, **/
{
module: 'MMM-Globe',
position: 'middle_center',
config: {
style: 'geoColor',
imageSize: 400,
ownImagePath:'',
updateInterval: 10*60*1000
}
},
{
module: "MMM-CalendarExt3Agenda",
header: "Familienkalender",
position: "top_right",
config: {
instanceId: "basicCalendar",
//locale: 'en-US',
waitFetch: 15000,
useWeather: false,
firstDayOfWeek: 1,
startDayIndex: 0,
endDayIndex: 7,
calendarSet: [],
}
},
{
module: "newsfeed",
position: "bottom_bar",
config: {
feeds: [
{
title: "N-tv",
url: "https://www.n-tv.de/rss"
}
],
showSourceTitle: true,
showPublishDate: true,
broadcastNewsFeeds: true,
broadcastNewsUpdates: true
}
},
{
module: "MMM-Jast",
position: "top_center",
config: {
currencyStyle: "code", // One of ["code", "symbol", "name"]
fadeSpeedInSeconds: 3.5,
lastUpdateFormat: "HH:mm",
maxChangeAge: 1 * 24 * 60 * 60 * 1000,
maxWidth: "100%",
numberDecimalsPercentages: 1,
numberDecimalsValues: 2,
scroll: "vertical", // One of ["none", "vertical", "horizontal"]
showColors: true,
showCurrency: true,
showChangePercent: true,
showChangeValue: false,
showChangeValueCurrency: false,
showHiddenStocks: false,
showLastUpdate: false,
showPortfolioValue: false,
showPortfolioGrowthPercent: false,
showPortfolioGrowth: false,
updateIntervalInSeconds: 300,
useGrouping: false,
virtualHorizontalMultiplier: 2,
stocks: [
{ name: "AMAZON", symbol: "AMZN", quantity: 10 },
{ name: "World Core", symbol: "URTH", quantity: 15 },
{ name: "S&P500", symbol: "^SPX" },
{ name: "NASDAQ", symbol: "^IXIC"}
]
}
},
{
module: "calendar",
config: {
broadcastPastEvents: false,
calendars: [
{
fetchInterval: 7 * 24 * 60 * 60 * 1000,
name: "Feiertage",
symbol: "calendar-check",
url: "https://onlinekalender.info/feiertage/deutschland/nordrhein-westfalen.ics",
broadcastPastEvents: false,
maximalNumberOfDays: 30,
MaximumEntries: 100
},
{
fetchInterval: 7 * 24 * 60 * 60 * 1000,
name: "Julia",
symbol: "calendar-check",
url: "https://calendar.google.com/calendar/ical/snip/basic.ics",
broadcastPastEvents: false,
maximalNumberOfDays: 30,
MaximumEntries: 100
},
{
fetchInterval: 7 * 24 * 60 * 60 * 1000,
url: "https://calendar.google.com/calendar/ical/snip/basic.ics",
name: "Tim",
symbol: "calendar-check",
broadcastPastEvents: false,
maximalNumberOfDays: 30,
MaximumEntries: 100
},
]
}
},
]
};
/*************** DO NOT EDIT THE LINE BELOW ***************/
if (typeof module !== "undefined") {module.exports = config;}
Conclusion
I highly encourage you to embark on the adventure of building your own display, tailored to your needs and preferences. While the traditional Magic Mirror setup is undoubtedly captivating, consider exploring alternative forms such as a standalone display. The choice depends on where and how you envision using it – whether as a stylish addition to your home decor or a functional tool to streamline your daily routine.
The beauty of this project lies not only in its end result but also in the journey of creation itself. Building a custom display provides an opportunity to develop a diverse set of skills, ranging from coding and hardware integration to design and problem-solving. Moreover, the process of building your own display is inherently enjoyable and rewarding.
Furthermore, undertaking such a project offers a chance to expand your horizons and learn new skills. Whether you’re delving into the world of electronics and circuitry, honing your programming prowess with JavaScript and Node.js, or refining your eye for design and aesthetics, there’s something to be gained from every aspect of the process.